Animated Flame GraphicHere is my first attempt at a moving flame graphic - it could be used as a cyber-Christmas card...
You need to collect your 'assets' together before you start your project. To gather them you need to have an idea of what you want to produce. You might sketch out your ideas on paper (make a storyboard). For this project you need:
These graphics are prepared using Fireworks so they can be imported into the flash document when required.
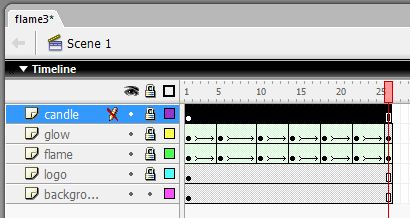
The 'flame flickering' images should not be at regular intervals - just roughly equal time intervals apart - so insert blank keyframes at suitable positions along the flame timeline. Insert a frame (not a keyframe) at the endpoint for the candle and the background. Then lock those layers Now pull the images of the flames into place at each stage. You need to have a 'shape tween' in between each flame graphic - but to do that you have to 'break apart' the graphics of the flames. Click on each flame graphic in turn going to (Modify - Break Apart) to make them ready for the 'shape tween'. Then click on the timeline between the images you want to 'tween' between and right click - 'insert tween' and in the properties box (at the bottom of the page) make it a 'shape tween' - not the default 'motion tween'. If you do this correctly you will have a green background within the timeline (as shown in the screen shot above) and there will be a little arrow in the green frame - if it is a dashed line it means you have not broken the images apart properly - try doing that again if this happpens. You now have to repeat this process with your 'halos' . Within the 'logo' layer I have added information about the Flash Document - you may add a title - your name or a message if you wish on that layer - otherwise delete it. You can now save the Flash document and export the movie as a swf.
It is easy to amend the animated project once finished - a couple of minutes spent changing things and you have a different result.. that is what is so wonderful about Flash!
Tutorial 19 shows you how to add sound files to your e-card... you could send a voice message or tune to your loved ones! |
|

Custom Search


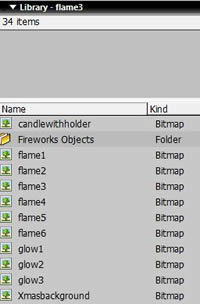 Open a new Flash document and import your assets into the library. The library should be visible on the right hand side of the page. If it is not then go to window - and tick 'Library' and it will apear.